Dialogic Systems GmbH & Co. KG
This page provides all relevant information about our touchpanels.
Installation
All HomeCockpit touchpanels can be classified in three installation versions.
Choose a variant you would like to get more information about and click the "more information" button.
In-Wall Touchpanel
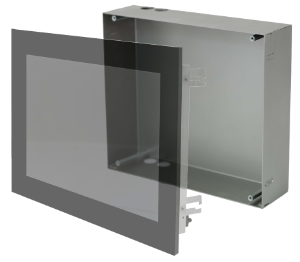 In-Wall mounted touchpanels are placed directly inside the wall, so only the display is visible. Therfore a wallbox which provides a holding mechanism for the touchpanel has to be mounted. Optionally an additional frame is available for people who prefer their touchpanel to be flush mounted with the wall.
Wallmount Touchpanel
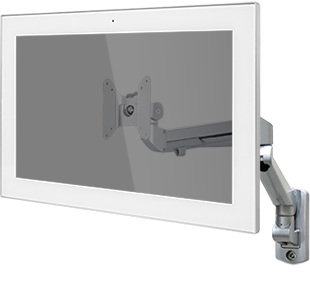 HomeCockpit Wallmount Touchpanels can be placed wherever you wish to. We offer different types of mounts to cover all needs. Choose between a static mount which provides minimal distance to the wall or a vesa 100 standard mount with pivot arm.
Installation In Existing Structure

The all new HomeCockpit GIRA KIT enables HomeCockpit Touchpanels of all power categories to be mounted in existing GIRA Control 9 and GIRA Control 19 wallboxes. Every necessary componennt is being shipped with the panel. Istalling these is as easy as plug and play.

Cleaning and Maintenance
HomeCockpit Touchpanles do nearly not need any maintenance. All following references apply to every type of HomeCockpit Touchpanel. In order to reduce risk of electrostatic charges damaging the TouchPanel please make sure to switch off and disconnect the panel from its' power source. To switch off the touchpanel use the "shut down" option in the windows menu or press the power button on the bottom side of the touchpanel for atleast 3 seconds.
Panel-Case
- Keep airflow vents clear: All vents on the bottom and top side of the case do not need to be covered by dust and other items, that do not belong there. In case of dust deposition, use a vacuum cleaner with a reasonably small tip.
Touchscreen
- The display of HomeCockpit touchpanels can be cleaned with regular glass cleaner. Apply the glass cleaner on some microfiber cloth and gently wipe the whole screen with it. If needed, use another piece of cloth to dry the display.
- IMPORTANT: Do NOT point the spray bottle directly to the touchpanel in order to reduce risk of dampness inside the case. Any form of damp-/ wetness inside could potentially damage the motherboard irreparably.
Defects
- Obvious defects: Upon receipt of the goods, the hardware must be checked for damages. The original packaging should be kept for any returns. If obvious hardware defects become apparent during first startup, inform the contact person from whom you obtained the device.
In parallel to investigations into whether and to what extent the damage occurred on the delivery route, Dialogic Systems will arrange for a replacement delivery as soon as possible. - Suspected defects: Should inexplicable problems occur during operation which can be lead back to hardware defects, please inform your source of purchase.
- Hardware damage, that can be traced back to incorrect operation, maintenance or external influences is responsibility of the user. Once the reasons or causes for the hardware error have been clarified, costs that have risen from replacement deliveries may be charged.
- Contact: If you experience any problems with the operation of your panel, or if it is damaged or defective, please contact the responsible contact person from whom you obtained the device.For the end user, this is the electrical engineering company or the audio / video system integrator. As one of these, return the panel to your' wholesaler or directly to Dialogic Systems.
- No unauthorized repair attemps: Repairs and opening of the device may only be carried out by service personnel authorized by Dialogic Systems. Any unauthorized manipulation of hardware or software will invalidate the warranty.
- Have information ready: Put all the information relevant to problem solving together in key words, if possible in writing. Have the serial number of your Dialogic touchpanel ready. This number is located on a sticker on the back of the device.
- Returns only on instructoin: Returns to Dialogic Systems may only be made after prior agreement. You will be given the address. Panels and frames are to be sent in the original packaging.
If you find a defect according to the criteria mentioned above, contact your source of purchase. The electrician / wholesaler will take care of the rectification of the defects as soon as possible.
If you purchased the product directly from us, please fill out the RMA form and send it to us. We will take the necessary steps to offer a repair or a replacement device.

Further information on warranty and support can be found here.
User Manual
Read the user manual to be informed about our Touchpanels perfectly.
PUB-Touchpanel-Handbuch-070220-1142-2096.pdf (as of yet: GERMAN ONLY)
Overview
Content Tools