Dialogic Systems GmbH & Co. KG
Questions regarding HomeCockpit hardware
Use our "AudioTest" tool to check microphone audio: AudioTest.exe
It enables you to check on general function of speakers and microphone, as well as voice performance brick functionality of both Major and Excelsior products.
- Start "AudioTest" and configure it's settings like following:
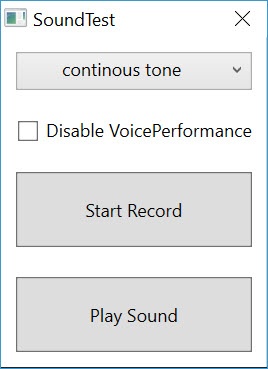
- Press "Start Record" and speak into the microphone
- Stop the recording by clicking "Start Record" again
- Play the recording by pressing "Play Sound"
If there is a voice performance brick built in your' HomeCockpit touchpanel, it should filter out most of the background noise.
In case you are unsure about the bricks functionality, try again with "Disabled Voice Performance"
In the rare case of touchscreen issues we suggest rebooting or disconnecting the touchpanel from it's power supply.
After starting the touchpanel back up again, touchscreen issues are resolved in most of the cases.
If the touchscreen problems still occur after rebooting/ rewiring, you can try reinstalling the touch driver:
- install UPDD_06_00_669.exe
- Copy mouse mode.ink and touch mode to your' desktop
- Double click on either shortcut switches bewteen mouse and touch mode
The touchpanel also keeps the applied mode after restart.
This tool also provides some comfortable opportunities (UPDD_06_00_669.exe has to be installed first)
Our MonitorResolution application was made specifically for this use case:
Change resolution upon UDP-command or via command line. It can also be used with it's basic UI by starting it like a regular application:
- Interactive call:
Whenever the tool is started without the ":hidden" parameter, a graphic UI will be displayed on the screen
Choose your desired resolution and click it to switch resolutions automatically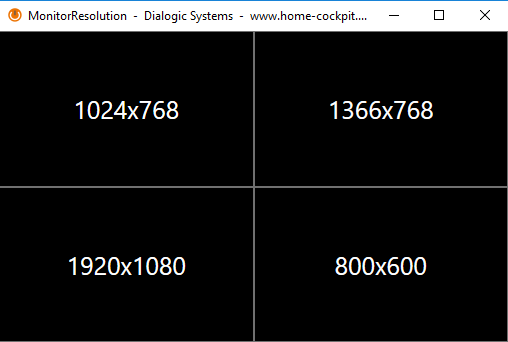
- Call via command line
When started via command line, parameters can be passed to the application. Following parameters are accepted:
"-hidden" → Hides UI and runs the application in background mode
"-port:xxxx" → switches from standard UDP-port (55050) to desired UDP-port
"-ip:xxx.xxx.xxx.xxx" → Listener IP of UPD-recipient (standard: 127.0.0.1)
"-res:1024x768" → switches resolution to 1024x768 (all supported resolutions are accepted)
Following examples of commandline execution can be used as reference:
MonitorResolution.exe -hidden -res:1024x768
Application is started without GUI and the displays resoltion is switched to 1024x768 immediately
MonitorResolution.exe -hidden
Application is started without GUI and is awaiting UDP commands at 127.0.0.1:55050
An example of a UDP command to switch the displays resolution could look like this: "-res:1024x768"
MonitorResolution.exe -hidden -ip:192.168.137.176 -port:1335
Application is again started without visible GUI and receives UDP commads on the configured ip and port.
An example of a UDP command to switch the displays resolution could look like this: "-res:1024x768"
Note: All resolutions supported by the graphics card can be configured. Unsupported resolutions will be ignored by the application and the resolution will not be changed.
This F.A.Q. site is under construction. Please be patient for further implementation.
Overview
Content Tools